
Baker and cookbook author Tara Jensen elevates her craft through practice, intuition, and fresh, locally milled flour.

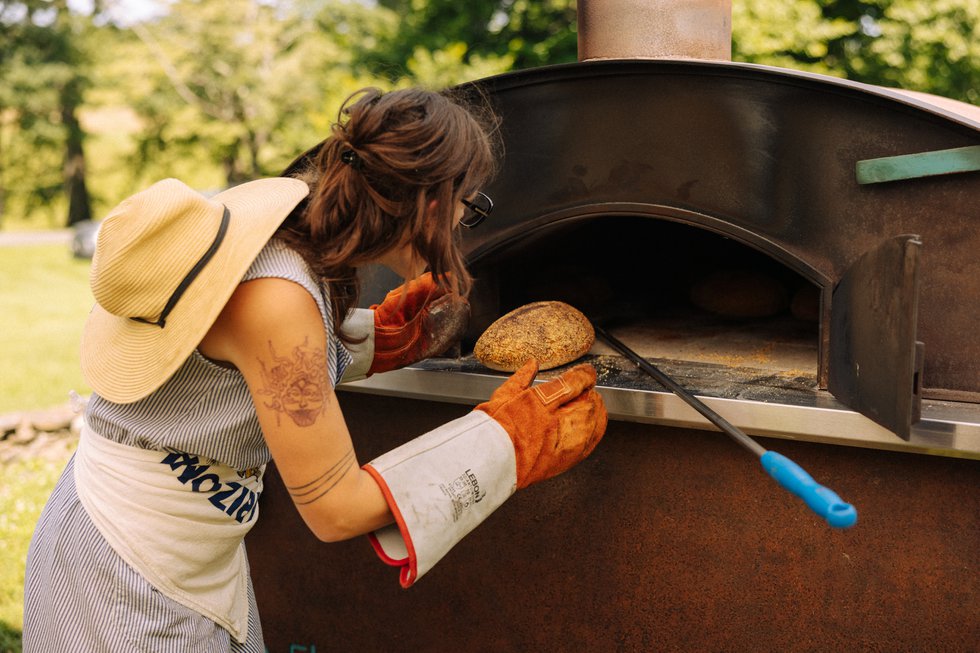
Tara Jensen wants us to see ourselves through the eyes of a baker. The sourdough evangelist is striking a chord with her stunning stenciled loaves, sold-out Sourdough Retreats, and her latest book, Flour Power: The Practice and Pursuit of Baking Sourdough Bread (Clarkson Potter), out this month. For Jensen, baking is a daily, almost meditative ritual and, through bread, she’s built a like-minded community. Her 100,000 Instagram followers know her simply as @bakerhands.
“You really start to see people’s personalities, both good and challenging, come out in how they respond to getting this gluey shaggy mass of bread dough all the way to a loaf of baked bread,” Jensen explains. “That process gives us a chance to look at how we respond to things.” Her disciples emerge from these immersive baking experiences with a deeper understanding of the finer points of sourdough—and of themselves.
“I like to encourage folks to look at each loaf of bread as a practice and not necessarily an end result,” she notes. “When you’ve made a nice loaf of bread, you walk with your chin up a little more. And that confidence translates to all parts of our lives.”
Baker’s Journal

Jensen and her family recently settled in Hamilton, a town of 700 in Loudoun County, from their cabin on the Virginia-Kentucky border. Here, she’s resumed her holistic teaching centered around discovery and reflection, and to that end, she encourages her students to keep a baking journal.
Jensen has stacks of them, filled with fermentation times and baking temperatures along with esoteric details like the weather and her mood. “Journaling is a gift that bakers can give themselves,” Jensen says. “You’ll get a better volume on your bread, but also realize that things can and do change. We grow, and when you keep a journal, you’re able to reflect back on it.”
She discovered baking while studying art philosophy at the College of the Atlantic in Bar Harbor, Maine. The tactile experience of kneading dough and shaping loaves was the ideal antidote to the cerebral work of academics. After graduation, she took a job at Red Hen Baking in Middlesex, Vermont, and found herself at home within the informal community that sprang up around the bakery.

Sharing Bread Mastery
Over the next decade, Jensen became a baking master, moving to Farm & Sparrow in Asheville, North Carolina, before opening Smoke Signals, her own wood-fired bakery in nearby Marshall. There, Jensen also began teaching, welcoming bakers from around the country. Through virtual classes, workshops, and retreats, Jensen urges her students to consider every aspect of a loaf of bread—down to the soil in which the wheat is grown. “I like to encourage people to think of flour for breadmaking the same way that winemakers think of grapes for different kinds of wines.”
Jensen wants bakers to understand how farming practices can directly impact a grain’s flavor. “I find it so exciting to work with freshly milled, stone-ground, regional grains if possible,” she says. Local grains bring a sense of place—of terroir—to each loaf of bread, allowing the home baker to literally taste their landscape. “That’s a loop that gets closed infrequently for us,” she explains. “Not only making the bread from start to finish but also with a local ingredient where you’re really tasting the essence of your region.”

Precision and Intuition

In Flour Power, Jensen presents recipes—she calls them “formulas”—for bread bakers at every level, and dives deep into the nuances of wheat, weather, fermentation, timing, and temperature. She relies on three sourdough starters—made with white flour, whole grain desem, or 100 percent rye flour.
There’s a bread for every baker in Flour Power. Jensen’s Workweek Bread, for example, is meant to be an approachable sandwich loaf, a blend of white and wheat flour that allows busy bakers the flexibility to tend to the dough on their own time.
When asked how she balances the need for precision with her baker’s intuition, honed over 20 years of daily baking, Jensen laughs: “I like to joke that my job as a teacher is to tell people that they actually do have to follow the directions.” The recipes in Flour Power use exact measurements, in grams, and require a digital scale. Most loaves evolve over days, which can seem daunting to novice bakers, but that’s part of the rhythm. “If you are new to it,” she says, “I encourage you to follow the directions to a T.”
She advises starting the night before with a technique she calls “the weigh out,” an evening ritual of reading through a recipe and weighing out ingredients for the next morning. “It’s this small thing that sets you up for success, particularly at home where you have to navigate a bit more chaos than at a professional bakery.”
As a mother to a toddler, Violet Rye (yes, like the bread), Jensen says she’s learned to shift her baking practice to leave room for joy and the unexpected realities of parenthood. She wants readers of Flour Power to feel empowered to bake no matter how busy they are, as a way to connect with the world around them. “I bake for myself as a form of therapy,” she writes in the book. “I bake to participate in a larger cultural movement, and I bake to remember it in my bones.” TaraEJensen.com
Workweek Bread
Refresh sourdough starter 6-10 hours before mixing and folding the dough, which is chilled overnight, then shaped, proofed, and baked the following day. Makes one 9-inch loaf.
Ingredients:
- 203g bread flour
- 203g whole wheat flour
- 325g water
- 102g sourdough starter
- 8g salt

Day One: Mix, Fold, and Chill
In a large bowl, thoroughly mix together flours, water, starter, and salt by hand. Dough will be sticky and shaggy. On a digital thermometer, dough should read 75°-81°F. Cover the bowl with a dinner plate and let rest for 1 hour.
Once dough is relaxed, give it three folds, spaced 1 hour apart. To fold, smear a little water onto a work surface like a table or countertop. Scoop dough onto the wet surface. Using hands, lift, then slap bottom half down. Stretch dough, then toss it over the portion on the table, and repeat three to four times. Dough will become smooth and pull into a ball. Return dough to container, smooth side up. Cover with a plate for 1 hour. Repeat process twice, at 1-hour intervals. Chill. After final fold, transfer dough to bowl, cover, and refrigerate 8-12 hours.
Day Two: Shape, Proof, and Bake
Lightly dust work surface with flour. Remove dough from the fridge and, using a dough scraper, gather it, flip onto a table, and pat into a rectangle, short side facing you. Fold the edge of dough over the top, leaving a 1-inch lip. Take sides of dough, gently stretch, then quickly cross them on top, like swaddling a baby. Next, stretch the edge of the dough closest to you to the top. Gently press down to create seam and seal. Use hands to gently drag the loaf on the table. The dough will curl into itself so seam is on bottom and top is smooth and roundish.
Sprinkle dough with flour, cover with kitchen towel, and let rest for 30 minutes. Lightly oil a 9-inch loaf pan. Dust table with flour and flip dough over, bringing bottom to top edge, leaving a 1-inch lip at the top. Gently stretch sides outward a few inches, then cross over the middle for an envelope shape. Stretch bottom of dough up to meet top of envelope and seal. The dough is now a cylinder on its side, seam facing away from you. Roll seam underneath, seal ends, then flip, seam side down, into loaf pan.
Loosely cover pan with a kitchen towel and proof dough in a draft-free spot for 3 hours. When fully proofed, the loaf will appear to have doubled in size.
Preheat oven to 500°F. Gently spritz dough with water before loading it into the oven. Bake at 500°F for 15 minutes, then reduce heat to 475°F and bake 15-20 minutes, or until loaf is deeply browned and internal temperature is 190°F. Remove bread from pan and cool on a wire rack. Stores up to 5 days, cut-side down, in a paper bag tucked inside a cloth bag.
How to Make Sourdough Starter
Sourdough starter transforms flour into “something tasty and nourishing,” Jensen says. To make it, choose a 1-quart wide-mouthed glass jar. Weigh jar in grams (without lid) so you can reserve the correct amount each time you refresh it.
DAY 1: Combine 50g rye flour and 50g bread flour with 100g water in jar. Stir vigorously. Mark line on container at top of starter with Sharpie. Cover to rest at room temperature for 24 hours.
DAY 2: To refresh the starter, zero your scale, then weigh container with starter. Discard starter until weight reflects 50g of starter—plus container weight. To this, add 100g combined bread flour and 100g water. Stir vigorously. Mark and label Day 2. Cover and let rest 24 hours.
DAYS 3-6: Repeat instructions for Day 2, noting the fill line with a fresh mark on the container, with date. Begin checking daily, 4-6 hours after refreshing. Note growth by comparing to the earlier Sharpie line. Once it begins to rise 4-6 hours after refreshing, you have an active starter.
DAY 7: Refresh as on Day 2. By now, starter should be bubbly, rise within hours of refreshing, and smell like yogurt. If it’s not bubbly and doesn’t rise, start over.
DAYS 8-13: Continue refreshing starter as directed on Day 2.
DAY 14: Congratulations! You have a healthy, active sourdough starter. Refresh as on Day 2. By Day 14, starter can be stored in refrigerator.
This article originally appeared in the October 2022 issue.